• Skip to primary navigation
  • Skip to main content
  • Skip to primary sidebar

The Tech Factors

All about your IT needs

  • Blog
  • About
  • Misc
  • Contact Us
You are here: Home / Networking / Transfer PuTTY sessions from one PC to another

Transfer PuTTY sessions from one PC to another

February 10, 2016 by virdih

PuTTY – PuTTY is a terminal emulation application which helps connecting to your networking devices via different networking protocols for example: telnet, SSH, Rlogin etc. You can use PuTTY to connect networking devices via serial port too. PuTTY saves the session information in Windows registry. We are going to discuss how to transfer PuTTY sessions from one PC to another in this post.

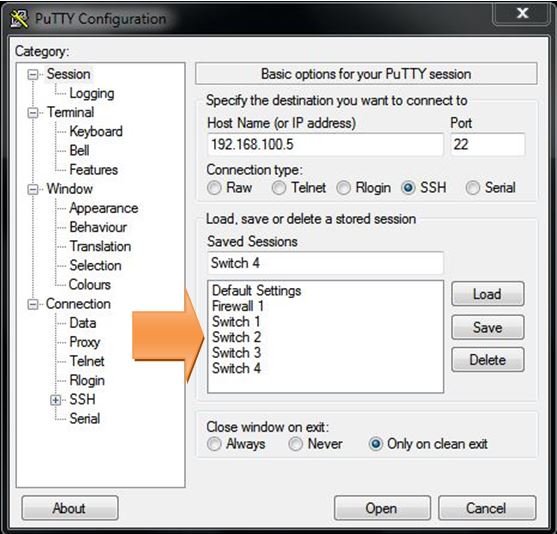
The picture below shows the saved PuTTY sessions ( Firewall 1, Switch 1, Switch 2, Switch3, Switch 4)

Transfer Putty sessions - saved sessions

TRANSFER PuTTY SESSIONS FROM ONE PC TO ANOTHER

EXPORT PuTTY SESSIONS

  1. Launch the registry
    START —> RUN —> type REGEDIT.EXETransfer Putty sessions - regedit
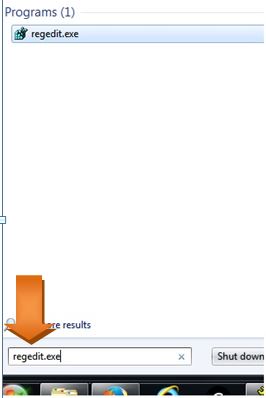
  2. Browse the below registry location:
    “Computer\HKEY_CURRENT_USER\Software\SimonTatham\PuTTY\Sessions”Transfer Putty sessions - export registry
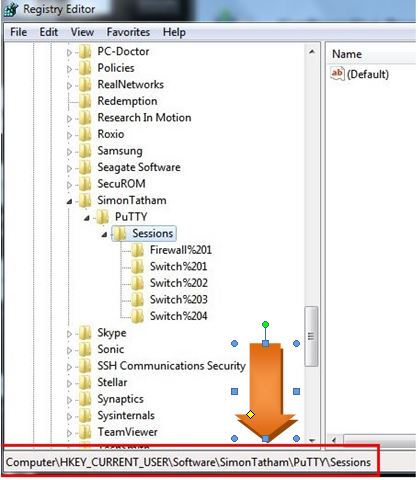
  3. Right click on Sessions and select ExportTransfer Putty sessions - export registry
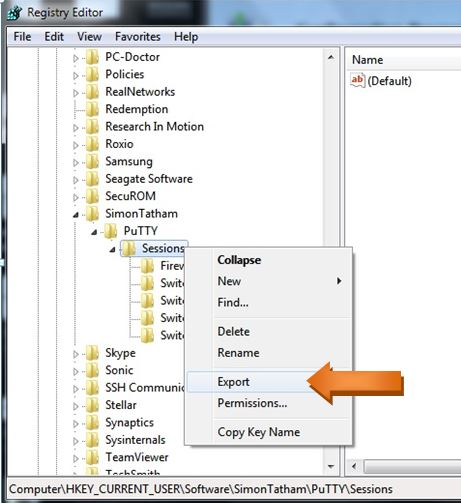
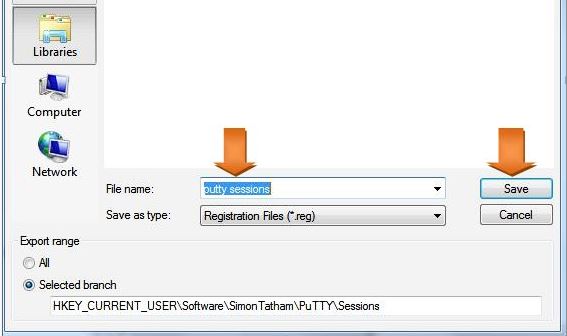
  4. Assign a filename and save itTransfer Putty sessions - save sessions

IMPORT SAVED PUTTY SESSIONS TO ANOTHER PC

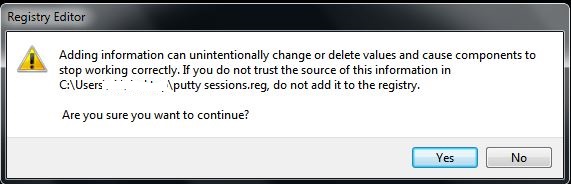
  1. Transfer\move the saved “putty sessions.reg” file to the desired Windows machine. Double click on the file and you will find below message. Hit YES to accept the message.Transfer Putty sessions - registry editor confirmation
  2. Finally, another message will appear and hit OKTransfer Putty sessions - pop up window for confirmation

After following the above procedure you will find the same sessions on the new computer as well.

Filed Under: Networking, Windows Tagged With: thetechfactors

Reader Interactions

Comments

  1. Kashif Iqbal says

    October 10, 2018 at 12:39 pm

    Great document

    • virdih says

      February 6, 2019 at 10:43 pm

      Thanks Kashif.

  2. Binder says

    March 9, 2021 at 7:49 pm

    Beautiful!!! Easy to follow steps. Thankyou

    • virdih says

      August 26, 2021 at 2:43 pm

      Thanks.

  3. Neil says

    July 2, 2021 at 4:20 am

    cool stuff thanks

    • virdih says

      August 26, 2021 at 2:44 pm

      Thanks Neil.

  4. Mayuri says

    September 14, 2021 at 1:55 pm

    Great document and to the point really helped

    • virdih says

      November 2, 2021 at 4:31 pm

      Thanks.

  5. Dao inc. says

    February 5, 2022 at 1:34 am

    Thank you

  6. Glen says

    April 29, 2022 at 3:55 pm

    this was perfect. thanks for this! it was a lifesaver when i got got my new pc

Primary Sidebar

Calendar

June 2025
S M T W T F S
1234567
891011121314
15161718192021
22232425262728
2930  
« Jan    

Archives

Featured Post

Adding a host to vCenter Server fails

January 9, 2021 By virdih

In case you find some issues while adding a VMWARE ESXi host to vCenter Server and you get an error message “A General System error Occurred” or “vim.fault.NoPermission”. This issue occurs by inconsistent authorization setup on the ESXi Host. The name of this authorization file is “authorization.xml” and located at /etc/vmware/hostd You can follow the […]

© 2016 | The Tech Factors
Sitemap